2.3 Analog Mixed Signal Design tools on Linux or WSL using Conda
Table of contents
Lecture video
In this tutorial, a distribution of Conda will be used to install the design tools and the PDKs.
Prerequisites
Preparation
Update your system
Update your linux distribution if you’ve just install it by running the following command:
sudo apt-get update -q && sudo apt-get upgrade -q -y
Install the required packages and build Gaw to view the simulation results
1. Install the required packages & Gaw
sudo apt install -q -y xterm gedit xdg-utils libgtk-3-dev build-essential
cass@unic-cass:~$ sudo apt install -q -y xterm gedit xdg-utils libgtk-3-dev build-essential
[sudo] password for cass:
Reading package lists...
Building dependency tree...
Reading state information...
build-essential is already the newest version (12.9ubuntu3).
build-essential set to manually installed.
gedit is already the newest version (41.0-3).
The following additional packages will be installed:
  gir1.2-atspi-2.0 icu-devtools libatk-bridge2.0-dev libatk1.0-dev libatspi2.
  ...
  pango1.0-tools perl-openssl-defaults pkg-config uuid-dev wayland-protocols x11-utils x11-xserver-utils x11proto-dev xbitmaps xorg-sgml-doctools xtrans-dev
Suggested packages:
  libdigest-hmac-perl libgssapi-perl libcairo2-doc libdatrie-doc freetype2-doc
  ...
  xfonts-cyrillic
The following NEW packages will be installed:
  gir1.2-atspi-2.0 icu-devtools libatk-bridge2.0-dev libatk1.0-dev
  ...
  x11-utils x11-xserver-utils x11proto-dev xbitmaps xdg-utils xorg-sgml-doctools xterm xtrans-dev
0 upgraded, 141 newly installed, 0 to remove and 9 not upgraded.
Need to get 29.0 MB of archives.
After this operation, 133 MB of additional disk space will be used.
Get:1 http://archive.ubuntu.com/ubuntu jammy/main amd64 gir1.2-atspi-2.0 amd64 2.44.0-3 [18.1 kB]
Get:2 http://archive.ubuntu.com/ubuntu jammy/main amd64 icu-devtools amd64 70.1-2 [197 kB]
Get:3 http://archive.ubuntu.com/ubuntu jammy/main amd64 pkg-config amd64 0.29.2-1ubuntu3 [48.2 kB]
...
Get:131 http://archive.ubuntu.com/ubuntu jammy/main amd64 libxmu6 amd64 2:1.1.3-3 [49.6 kB]
Setting up libxcursor-dev:amd64 (1:1.2.0-2build4) ...
Setting up libepoxy-dev:amd64 (1.5.10-1) ...
...
Setting up libegl1-mesa-dev:amd64 (23.2.1-1ubuntu3.1~22.04.2) ...
Setting up libgtk-3-dev:amd64 (3.24.33-1ubuntu2.2) ...
Finally, setting gedit as your default editor:
xdg-mime default org.gnomne.gedit.desktop text/plain
2. Download conda package & install conda-eda environment into eda/uniccass
wget https://repo.anaconda.com/miniconda/Miniconda3-latest-Linux-x86_64.sh -O ~/miniconda.sh
bash ~/miniconda.sh -b -p $HOME/eda/unic-cass
source $HOME/eda/unic-cass/bin/activate
cass@unic-cass:~$ wget https://github.com/conda-forge/miniforge/releases/download/24.1.2-0/Mambaforge-24.1.2-0-Linux-x86_64.sh
--2024-07-24 15:40:02--  https://github.com/conda-forge/miniforge/releases/download/24.1.2-0/Mambaforge-24.1.2-0-Linux-x86_64.sh
Resolving github.com (github.com)... 140.82.121.4
Connecting to github.com (github.com)|140.82.121.4|:443... connected.
HTTP request sent, awaiting response... 302 Found
Location: https://objects.githubusercontent.com/github-production-release-asset-2e65be/221584272/6363ec6d-9f04-4cad-8608-6fa34e1499ab?X-Amz-Algorithm=AWS4-HMAC-SHA256&X-Amz-Credential=releaseassetproduction%2F20240724%2Fus-east-1%2Fs3%2Faws4_request&X-Amz-Date=20240724T084001Z&X-Amz-Expires=300&X-Amz-Signature=e065abce55c60a97b0248bdbf8e83e94242b39f14c91a6b6e6a3368d0a62eef7&X-Amz-SignedHeaders=host&actor_id=0&key_id=0&repo_id=221584272&response-content-disposition=attachment%3B%20filename%3DMambaforge-24.1.2-0-Linux-x86_64.sh&response-content-type=application%2Foctet-stream [following]
--2024-07-24 15:40:03--  https://objects.githubusercontent.com/github-production-release-asset-2e65be/221584272/6363ec6d-9f04-4cad-8608-6fa34e1499ab?X-Amz-Algorithm=AWS4-HMAC-SHA256&X-Amz-Credential=releaseassetproduction%2F20240724%2Fus-east-1%2Fs3%2Faws4_request&X-Amz-Date=20240724T084001Z&X-Amz-Expires=300&X-Amz-Signature=e065abce55c60a97b0248bdbf8e83e94242b39f14c91a6b6e6a3368d0a62eef7&X-Amz-SignedHeaders=host&actor_id=0&key_id=0&repo_id=221584272&response-content-disposition=attachment%3B%20filename%3DMambaforge-24.1.2-0-Linux-x86_64.sh&response-content-type=application%2Foctet-stream
Resolving objects.githubusercontent.com (objects.githubusercontent.com)... 185.199.108.133, 185.199.110.133, 185.199.109.133, ...
Connecting to objects.githubusercontent.com (objects.githubusercontent.com)|185.199.108.133|:443... connected.
HTTP request sent, awaiting response... 200 OK
Length: 84438822 (81M) [application/octet-stream]
Saving to: ‘Mambaforge-24.1.2-0-Linux-x86_64.sh’

Mambaforge-24.1.2-0-Linux-x86_64.sh         100%[============================>]  80.53M  9.94MB/s    in 8.5s

2024-07-24 15:40:12 (9.52 MB/s) - ‘Mambaforge-24.1.2-0-Linux-x86_64.sh’ saved [84438822/84438822]

cass@unic-cass:~$ bash Mambaforge-24.1.2-0-Linux-x86_64.sh -b -p $HOME/eda/unic-cass
PREFIX=/home/cass/eda/unic-cass
Unpacking payload ...
Extracting _libgcc_mutex-0.1-conda_forge.tar.bz2
...
Extracting mamba-1.5.7-py310h51d5547_0.conda

Installing base environment...


                                           __
          __  ______ ___  ____ _____ ___  / /_  ____ _
         / / / / __ `__ \/ __ `/ __ `__ \/ __ \/ __ `/
        / /_/ / / / / / / /_/ / / / / / / /_/ / /_/ /
       / .___/_/ /_/ /_/\__,_/_/ /_/ /_/_.___/\__,_/
      /_/

Transaction

  Prefix: /home/cass/eda/unic-cass

  Updating specs:

   - conda-forge/linux-64::_libgcc_mutex==0.1=conda_forge[md5=d7c89558ba9fa0495403155b64376d81]
  ...
   - conda-forge/linux-64::mamba==1.5.7=py310h51d5547_0[md5=5977cafef2904d1588d0c23b94846f2c]


  Package                         Version  Build               Channel           Size
───────────────────────────────────────────────────────────────────────────────────────
  Install:
───────────────────────────────────────────────────────────────────────────────────────

  + _libgcc_mutex                     0.1  conda_forge         conda-forge     Cached
  + _openmp_mutex                     4.5  2_gnu               conda-forge     Cached
  ...
  + zstandard                      0.22.0  py310h1275a96_0     conda-forge     Cached
  + zstd                            1.5.5  hfc55251_0          conda-forge     Cached

  Summary:

  Install: 78 packages

  Total download: 0 B

───────────────────────────────────────────────────────────────────────────────────────

Transaction starting
Linking _libgcc_mutex-0.1-conda_forge
Linking ca-certificates-2024.2.2-hbcca054_0
...
Linking mamba-1.5.7-py310h51d5547_0
Transaction finished
installation finished.
cass@unic-cass:~$ source $HOME/eda/unic-cass/bin/activate
(base) cass@unic-cass:~$
3. Install the tools and IHP-SG13g2 pdks
conda install -c unic-cass xschem netgen magic ngspice open_pdks.ihp-sg13g2 klayout
(base) cass@unic-cass:~$ conda install -c unic-cass xschem netgen magic ngspice open_pdks.ihp-sg13g2 klayout

Looking for: ['xschem', 'netgen', 'magic', 'ngspice', 'open_pdks.sky130a']

conda-forge/linux-64                                        Using cache
conda-forge/noarch                                          Using cache
unic-cass/noarch                                              No change
unic-cass/linux-64                                            No change

Pinned packages:
  - python 3.10.*


Transaction

  Prefix: /home/cass/eda/unic-cass

  Updating specs:

   - xschem
   - netgen
   - magic
   - ngspice
   - open_pdks.ihp-sg13g2
   - ca-certificates
   - certifi
   - openssl


  Package                                  Version  Build            Channel           Size
─────────────────────────────────────────────────────────────────────────────────────────────
  Install:
─────────────────────────────────────────────────────────────────────────────────────────────

  + netgen                      1.5.272_0_g178af5f  20240223_100318  unic-cass        792kB
  + ngspice                    39.3_552_g902a62d2f  20240223_100318  unic-cass          3MB
  + open_pdks.ihp-sg13g2        1.0.471_0_g97d0844  20240223_100318  unic-cass          1GB
  + zlib                                    1.2.13  hd590300_5       conda-forge       93kB
  ...
  + xschem                     3.4.4_558_g6405ac4c  20240223_100318  unic-cass         12MB

  Upgrade:
─────────────────────────────────────────────────────────────────────────────────────────────

  - ca-certificates                       2024.2.2  hbcca054_0       conda-forge     Cached
  + ca-certificates                       2024.7.4  hbcca054_0       conda-forge      155kB
  - openssl                                  3.2.1  hd590300_1       conda-forge     Cached
  + openssl                                  3.3.1  h4bc722e_2       conda-forge        3MB
  - certifi                               2024.2.2  pyhd8ed1ab_0     conda-forge     Cached
  + certifi                               2024.7.4  pyhd8ed1ab_0     conda-forge      159kB

  Summary:

  Install: 34 packages
  Upgrade: 3 packages

  Total download: 1GB

─────────────────────────────────────────────────────────────────────────────────────────────


Confirm changes: [Y/n] y
zlib                                                92.8kB @ 458.6kB/s  0.2s
ca-certificates                                    154.9kB @ 650.2kB/s  0.2s
xorg-kbproto                                        27.3kB @  84.4kB/s  0.1s
...
pixman                                             386.8kB @  97.4kB/s  0.3s
magic                                                4.9MB @   1.1MB/s  2.5s
xschem                                              12.3MB @   1.8MB/s  3.5s
open_pdks.sky130a                                    1.3GB @   8.0MB/s 2m:45.3s

Downloading and Extracting Packages:

Preparing transaction: done
Verifying transaction: done
Executing transaction: done
Run the example design
1. Set up the design environment
Firstly, we have to create the project directory to store the project configurations and files. After that, we have to set the PDK environment variable, copy the xschem configuration file to the project directory before running xschem. The above procedure can be done by running the following commands:
mkdir -p $HOME/unic-cass-example/xschem
export PDK_ROOT=$CONDA_PREFIX/share/pdk
export PDK=ihp-sg13g2
cp -a $PDK_ROOT/$PDK/libs.tech/xschem/xschemrc $HOME/unic-cass-example/xschem
cd $HOME/unic-cass-example/xschem
(base) cass@unic-cass:~$ mkdir -p $HOME/unic-cass-example/xschem
(base) cass@unic-cass:~$ export PDK_ROOT=$CONDA_PREFIX/share/pdk
(base) cass@unic-cass:~$ export PDK=ihp-sg13g2
(base) cass@unic-cass:~$ cp -a $PDK_ROOT/$PDK/libs.tech/xschem/xschemrc $HOME/unic-cass-example/xschem
(base) cass@unic-cass:~$ cd $HOME/unic-cass-example/xschem
(base) cass@unic-cass:~/unic-cass-example/xschem$
Run the example design
1. Run xschem inside the docker image
xschem
2. Open IHP testcases in xschem
To open the IHP testcases example, click on IHP testcases under
NGSPICE + XYCE and press e.
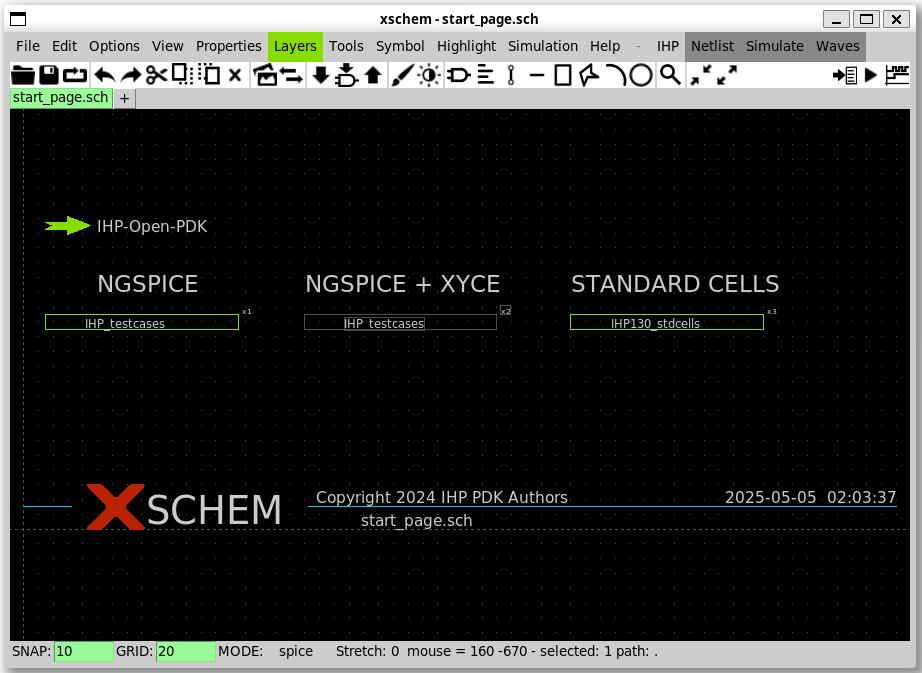
The test circuits for IHP testcases will appear in the xschem window.
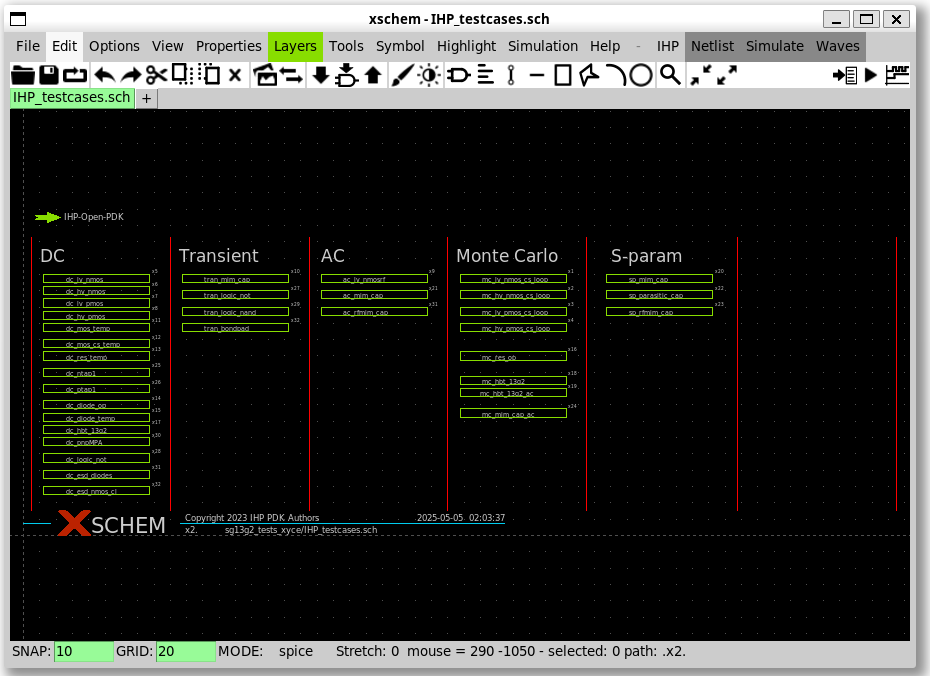
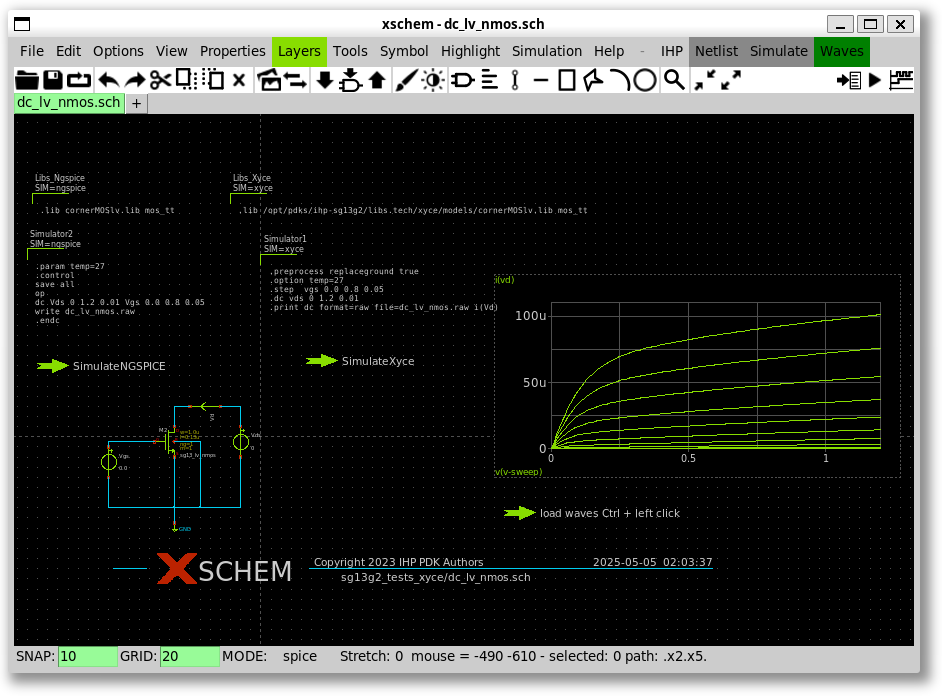
3. Open DC lv_nmos schematic in xschem
To open the DC lv_nmos schematic, click on DC lv_nmos under DC
category and press e. The test circuits for DC lv_nmos will appear
in the xschem window.
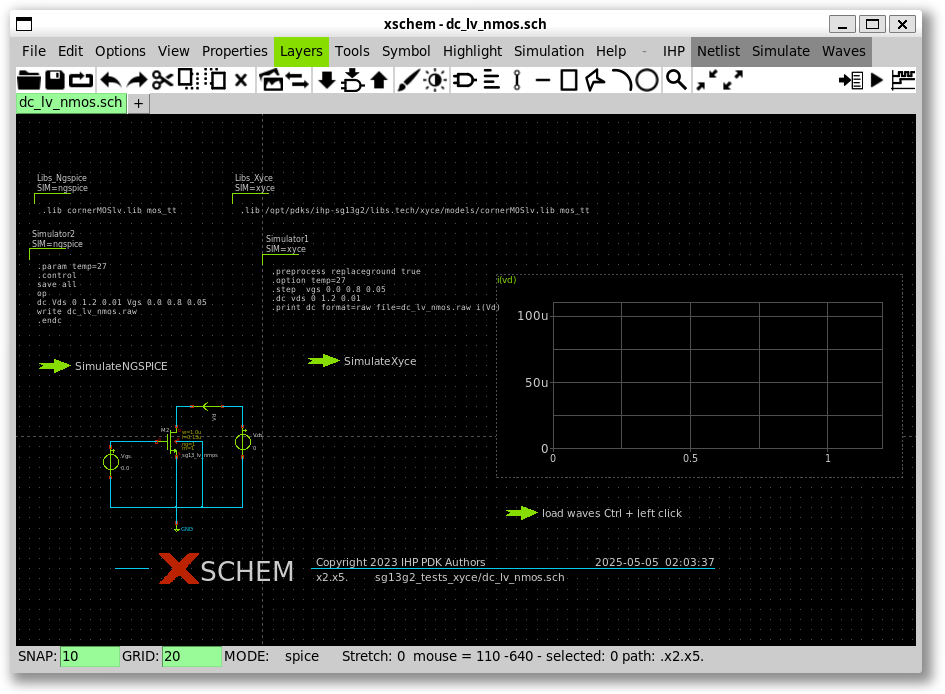
4. Run the simulation
To run the simulation using ngspice, hold Ctrl key and click on the
arrow labelled SimulateNGSPICE. Then the simulation will show up on
the screen.
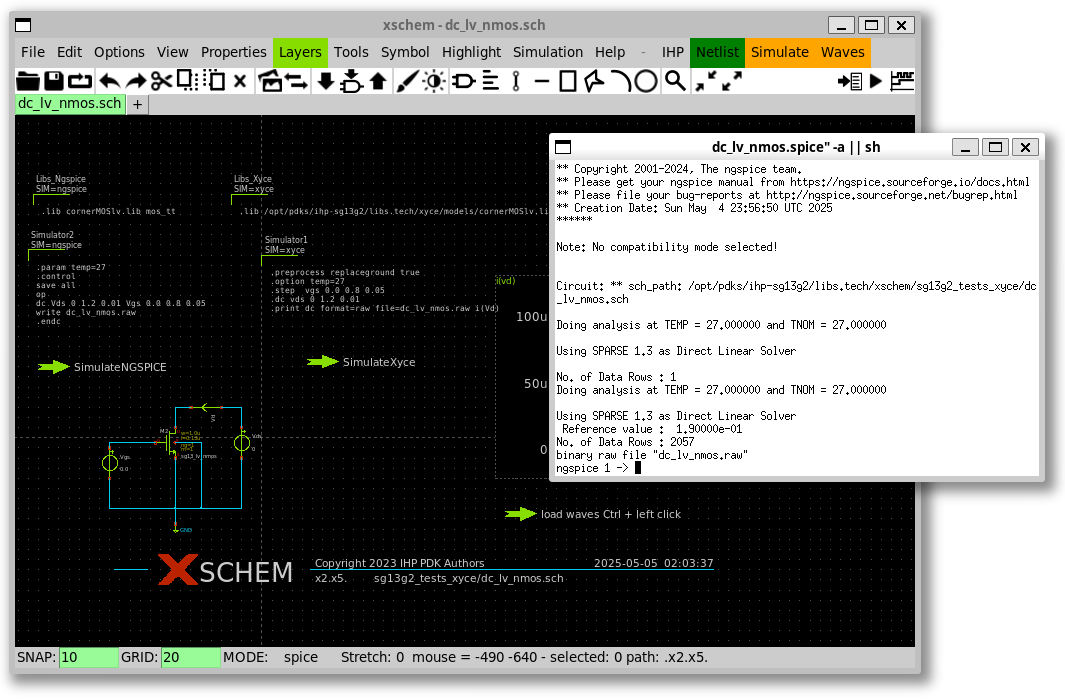
You can also click on Netlist then click Simulate.
5. Update simulation results in Xschem’s window
To display the waveform in the xschem window, hold the left CTRL
button and click on the arrow labelled load waves in the schematic
view.
6. Go back to the top schematic.
To come back to the top-level, you can press Ctrl + e.
What’s next?
At this step, you have successfully run the simulation of a test
circuit in the IHP examples. You can try with other examples in the
Xschem top level design. In addition, there are also other examples
that you can investigate, simulate, and learn from them.