2.2 Analog Mixed Signal Design using docker image
Table of contents
Install and start Docker service
1. Install docker service
Install docker by following the instruction here: https://docs.docker.com/engine/install/ubuntu/
This is the command that I used in Ubuntu 22.04:
sudo apt-get install ca-certificates curl gnupg -q -y
sudo install -m 0755 -d /etc/apt/keyrings
curl -fsSL https://download.docker.com/linux/ubuntu/gpg | sudo gpg --dearmor -o /etc/apt/keyrings/docker.gpg
sudo chmod a+r /etc/apt/keyrings/docker.gpg
echo   "deb [arch="$(dpkg --print-architecture)" signed-by=/etc/apt/keyrings/docker.gpg] https://download.docker.com/linux/ubuntu "$(. /etc/os-release && echo "$VERSION_CODENAME")" stable" | sudo tee /etc/apt/sources.list.d/docker.list > /dev/null
sudo apt-get update -q
sudo apt-get install -q -y docker-ce docker-ce-cli containerd.io  docker-buildx-plugin docker-compose-plugin
cass@unic-cass:~$ sudo apt-get install ca-certificates curl gnupg -q -y
Reading package lists...
Building dependency tree...
Reading state information...
ca-certificates is already the newest version (20230311ubuntu0.22.04.1).
ca-certificates set to manually installed.
curl is already the newest version (7.81.0-1ubuntu1.16).
curl set to manually installed.
gnupg is already the newest version (2.2.27-3ubuntu2.1).
gnupg set to manually installed.
0 upgraded, 0 newly installed, 0 to remove and 2 not upgraded.

cass@unic-cass:~$ sudo install -m 0755 -d /etc/apt/keyrings
cass@unic-cass:~$ curl -fsSL https://download.docker.com/linux/ubuntu/gpg | sudo gpg --dearmor -o /etc/apt/keyrings/docker.gpg
cass@unic-cass:~$ sudo chmod a+r /etc/apt/keyrings/docker.gpg
cass@unic-cass:~$ echo   "deb [arch="$(dpkg --print-architecture)" signed-by=/etc/apt/keyrings/docker.gpg] https://download.docker.com/linux/ubuntu "$(. /etc/os-release && echo "$VERSION_CODENAME")" stable" | sudo tee /etc/apt/sources.list.d/docker.list > /dev/null

cass@unic-cass:~$ sudo apt-get update -q
Get:1 https://download.docker.com/linux/ubuntu jammy InRelease [48.8 kB]
Hit:2 http://archive.ubuntu.com/ubuntu jammy InRelease
Hit:3 http://archive.ubuntu.com/ubuntu jammy-updates InRelease
Get:4 https://download.docker.com/linux/ubuntu jammy/stable amd64 Packages [36.4 kB]
Hit:5 http://archive.ubuntu.com/ubuntu jammy-backports InRelease
Hit:6 http://security.ubuntu.com/ubuntu jammy-security InRelease
Fetched 85.3 kB in 1s (157 kB/s)
Reading package lists...
Reading package lists...
Building dependency tree...
Reading state information...

cass@unic-cass:~$ sudo apt-get install -q -y docker-ce docker-ce-cli containerd.io  docker-buildx-plugin docker-compose-plugin
The following additional packages will be installed:
  docker-ce-rootless-extras libslirp0 pigz slirp4netns
Suggested packages:
  aufs-tools cgroupfs-mount | cgroup-lite
The following NEW packages will be installed:
  containerd.io docker-buildx-plugin docker-ce docker-ce-cli docker-ce-rootless-extras docker-compose-plugin libslirp0 pigz slirp4netns
0 upgraded, 9 newly installed, 0 to remove and 2 not upgraded.
Need to get 122 MB of archives.
After this operation, 436 MB of additional disk space will be used.
Get:1 https://download.docker.com/linux/ubuntu jammy/stable amd64 containerd.io amd64 1.7.19-1 [30.5 MB]
Get:2 http://archive.ubuntu.com/ubuntu jammy/universe amd64 pigz amd64 2.6-1 [63.6 kB]
...
Get:9 https://download.docker.com/linux/ubuntu jammy/stable amd64 docker-compose-plugin amd64 2.29.0-1~ubuntu.22.04~jammy [12.5 MB]
Fetched 122 MB in 13s (9488 kB/s)
Selecting previously unselected package pigz.
(Reading database ... 44296 files and directories currently installed.)
Preparing to unpack .../0-pigz_2.6-1_amd64.deb ...
Unpacking pigz (2.6-1) ...
...
Selecting previously unselected package slirp4netns.
Preparing to unpack .../8-slirp4netns_1.0.1-2_amd64.deb ...
Unpacking slirp4netns (1.0.1-2) ...
Setting up docker-buildx-plugin (0.16.1-1~ubuntu.22.04~jammy) ...
Setting up containerd.io (1.7.19-1) ...
Created symlink /etc/systemd/system/multi-user.target.wants/containerd.service → /lib/systemd/system/containerd.service.
Setting up docker-compose-plugin (2.29.0-1~ubuntu.22.04~jammy) ...
...
Setting up docker-ce (5:27.1.0-1~ubuntu.22.04~jammy) ...
Created symlink /etc/systemd/system/multi-user.target.wants/docker.service → /lib/systemd/system/docker.service.
Created symlink /etc/systemd/system/sockets.target.wants/docker.socket → /lib/systemd/system/docker.socket.
Processing triggers for man-db (2.10.2-1) ...
Processing triggers for libc-bin (2.35-0ubuntu3.8) ...
cass@unic-cass:~$
2. Start the docker service
If you use a real Linux system or a WSL Linux system with Systemd supported, you can start docker by running this command:
sudo systemctl start docker
sudo systemctl enable docker
cass@unic-cass:~$ sudo systemctl start docker
cass@unic-cass:~$ sudo systemctl enable docker
Synchronizing state of docker.service with SysV service script with /lib/systemd/systemd-sysv-install.
Executing: /lib/systemd/systemd-sysv-install enable docker
3. Add user to docker group
You will also need to add your user to docker group so that you have permission to pull the docker image as normal users:
sudo gpasswd -a $USER docker
cass@unic-cass:~$ sudo gpasswd -a $USER docker
Adding user cass to group docker
To get the above command taking effect, you have to log out:
exit
After that, you can open a new shell and continue to the next section.
If your WSL Ubuntu 22.04 does not have Systemd support, you can still run Docker using System-V init script using the following command:
sudo service docker start
Download the docker source files and start the UNIC-CASS Docker image
1. Clone the repository:
Open your terminal and execute the following command to clone the repository to your local machine:
git clone https://github.com/unic-cass/uniccass-icdesign-tools.git
2. Navigate to the repository directory:
Change into the directory created by cloning the repository:
cd uniccass-icdesign-tools/
3. Start the docker image by runing make start:
Execute the make start command to start the process defined in the
Makefile:
make start
cass@unic-cass:~$ git clone https://github.com/unic-cass/uniccass-icdesign-tools.git
Cloning into 'uniccass-icdesign-tools'...
remote: Enumerating objects: 571, done.
remote: Counting objects: 100% (376/376), done.
remote: Compressing objects: 100% (236/236), done.
remote: Total 571 (delta 175), reused 283 (delta 95), pack-reused 195 (from 1)
Receiving objects: 100% (571/571), 71.95 MiB | 3.45 MiB/s, done.
Resolving deltas: 100% (244/244), done.
cass@unic-cass:~$ cd uniccass-icdesign-tools/
cass@unic-cass:~/uniccass-icdesign-tools$ make start
docker image pull isaiassh/unic-cass-tools:1.0.0
1.0.0: Pulling from isaiassh/unic-cass-tools
30a9c22ae099: Pull complete
9de05c6b613e: Pull complete
9bd619e83424: Pull complete
01f28496e734: Pull complete
ea98d491f203: Pull complete
1449896d1056: Pull complete
87f3830d0385: Pull complete
73a54b8cec06: Pull complete
b6cfa4f96202: Pull complete
a57233b018b3: Pull complete
d6a1a31aacec: Pull complete
425ae8d789d1: Pull complete
dfd5c84a6d54: Pull complete
dd3e74e76b94: Pull complete
4795cb3cecb8: Pull complete
f1252ad9b9eb: Pull complete
2d58e9f68adf: Pull complete
2d97fb1e98b6: Pull complete
07942dd2593b: Pull complete
5ba3a85db7fa: Pull complete
fbff8af1fe8b: Pull complete
f947fe7bfb5a: Pull complete
6eb767da092d: Pull complete
4f4fb700ef54: Pull complete
28a334f53e17: Pull complete
07a4722fdb82: Pull complete
Digest: sha256:99003c7d13e682476a76bebde8138ea165cf5db45df7f1192e38d27c11a6c8d0
Status: Downloaded newer image for isaiassh/unic-cass-tools:1.0.0
docker.io/isaiassh/unic-cass-tools:1.0.0
docker run -it  --mount type=bind,source=/home/cass/uniccass-icdesign-tools/shared_xserver,target=/home/designer/shared -v /tmp/.X11-unix:/tmp/.X11-unix:ro -v /home/cass/.Xauthority:/root/.Xauthority:rw -v /home/cass/.Xauthority:/home/designer/.Xauthority:rw --net=host -e SHELL=/bin/bash -e PDK=ihp-sg13g2 -e DISPLAY -e LIBGL_ALWAYS_INDIRECT=1 -e XDG_RUNTIME_DIR -e PULSE_SERVER -e USER_ID=1000 -e USER_GROUP=1000 --name usm-vlsi-tools-a1e884fae23b5d710498da8463677bf3 --rm isaiassh/unic-cass-tools:1.0.0
PDK set to ihp-sg13g2
designer ~
$
Run the example design
1. Run xschem inside the docker image
xschem
2. Open IHP testcases in xschem
To open the IHP testcases example, click on IHP testcases under
NGSPICE + XYCE and press e.
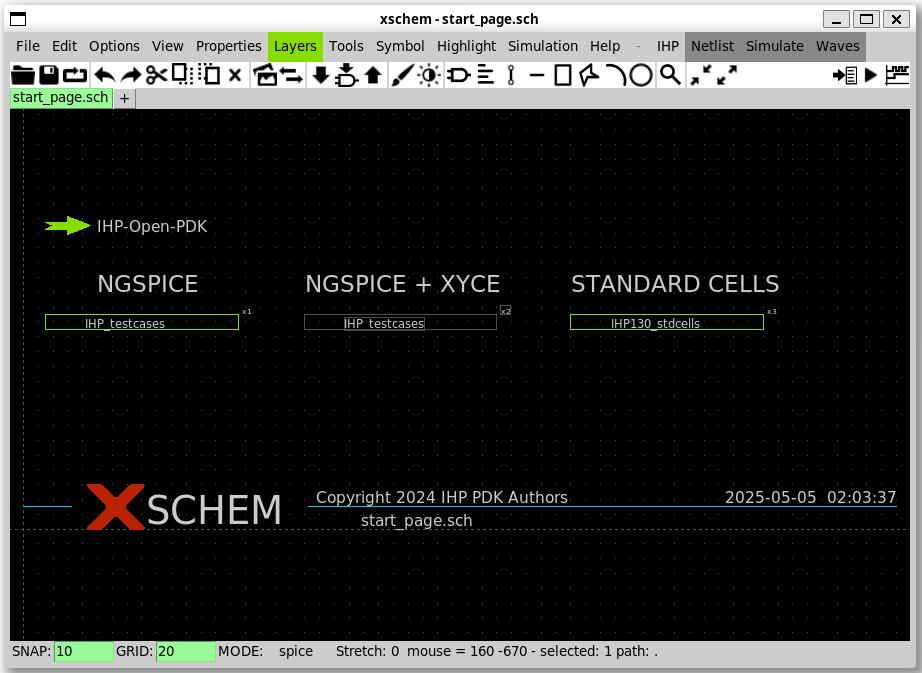
The test circuits for IHP testcases will appear in the xschem
window.
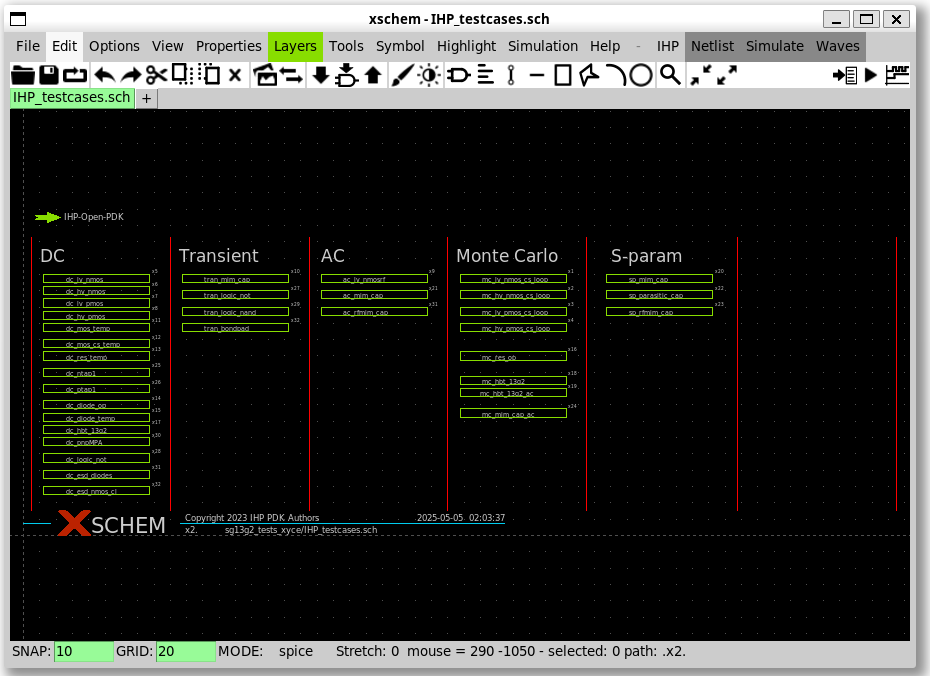
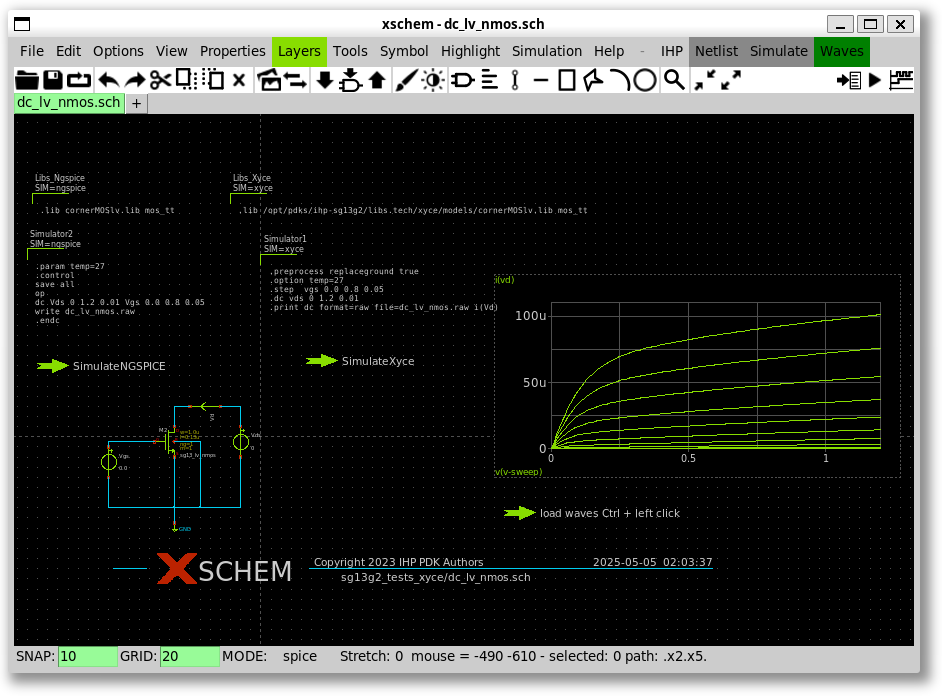
3. Open DC lv_nmos schematic in xschem
To open the DC lv_nmos schematic, click on DC lv_nmos under DC
category and press e. The test circuits for DC lv_nmos will appear
in the xschem window.
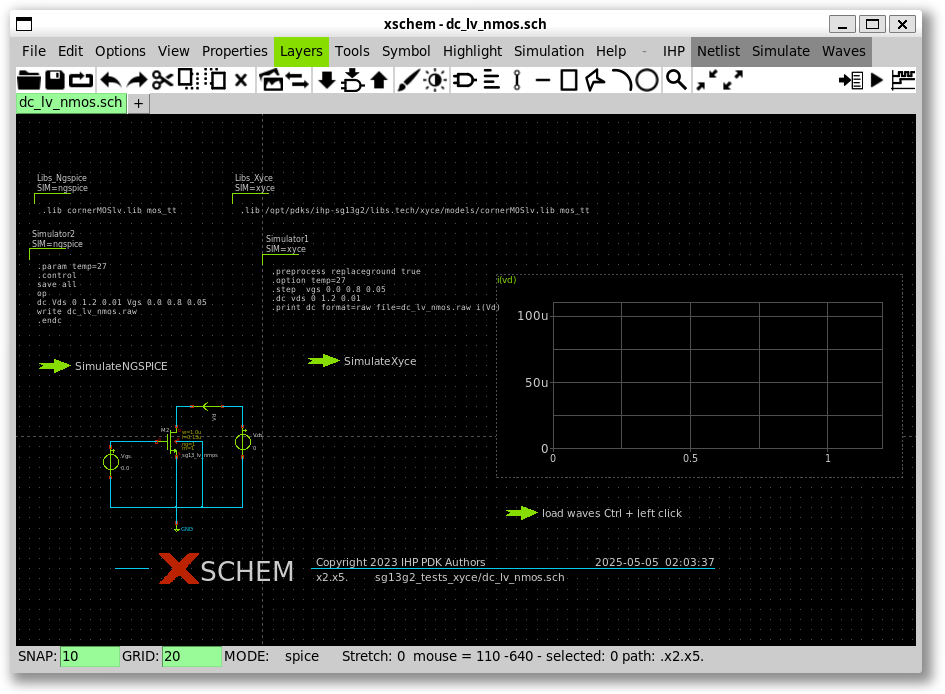
4. Run the simulation
To run the simulation using ngspice, hold Ctrl key and click on the
arrow labelled SimulateNGSPICE. Then the simulation will show up on
the screen.
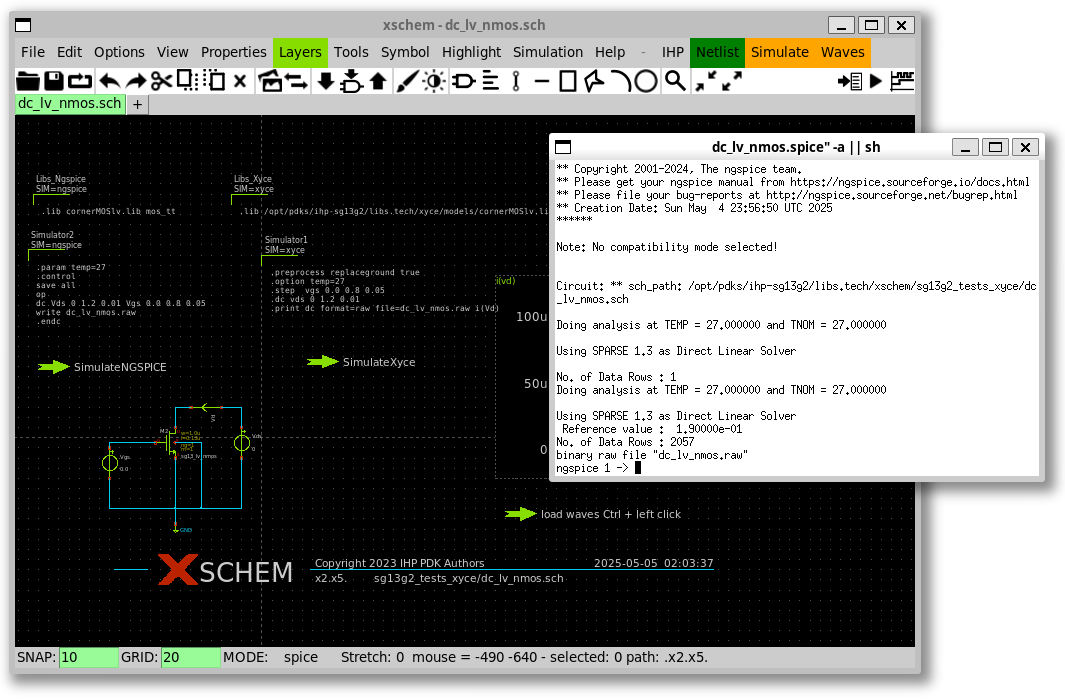
You can also click on Netlist then click Simulate.
5. Update simulation results in Xschem’s window
To display the waveform in the xschem window, hold the left CTRL
button and click on the arrow labelled load waves in the schematic
view.
6. Go back to the top schematic.
To come back to the top-level, you can press Ctrl + e.
What’s next?
At this step, you have successfully run the simulation of a test
circuit in the IHP examples. You can try with other examples in the
Xschem top level design. In addition, there are also other examples
that you can investigate, simulate, and learn from them.